Showing posts with label Yu-Yunique. Show all posts

Monday, 21 November 2016

Stuck in Bootloop - Yu Yunique


Stuck in Bootloop

Sometimes when you are stuck in Bootloop in Yu Yunique
It doesn't let you open recovery or fastboot.

This is cause of the YU Official Firmware Images.


Fix :-
1. Let your device turn on until YU Logo shows up on the screen.
2. After that press & hold only Power button. Phone will turn off with a vibration for some seconds.
3. Within that time interval press & hold "Vol Up + Power Button" ( You need to follow this step as fast as you can after step 2)
4. Phone will boot to recovery.
5. Dang! Flash any other ROM / Restore Backup.

Stay Tuned! :-)

Tuesday, 3 May 2016

How to Flash [ROM][UNOFFICIAL] XOSP-5.4 for YU yunique (jalebi)

XOSP-5.4 for YU yunique (jalebi)


Downloads:

ROM- Click Here
XOSP Apps(Recommended)- Click Here
GApps- {ARM|6.0|pico} - Click Here

-INSTALLATION INSTRUCTION-

  1. Download the latest build
  2. Boot into Recovery TWRP-3.0.0-0
  3. Go to twrp> then wipe> then advance wipe>
  4. Then click on data and click on change file partition > ext4
  5. Then click on cache >change file partition > ext4
  6. Then wipe dalvik cache,cache,data,system
  7. Then flash rom 
  8. Then Flash XOSP Apps(Required)
  9. Wipe Cache and Dalvik Cache.
  10. Then flash gaaps arm 6.0
  11. Wipe Cache and Dalvik Cache.
  12. Finally, Reboot and ENJOY!! :)


Done.

Credits:

@Karthick Vee (for building the ROM)
@nilac
CM for the base sources
The Sony Xperia community who provided the system dumps and allowed me to work on the Apps
@malybru and @nightwalkerkg for the two logos

Sunday, 10 April 2016

How to repair your Hard Bricked Yu Yunique


Prerequisites:

1. Charge your phone for atleast 2 hours.
2. Install Qualcomm HS USB Drivers.
                         Download
3. Connect your phone to PC and check if it is being detected by your PC or not.
4. Open Device Manager by right clicking on My computer and selecting Manage.
5. In the left hand side you will see Device Manager option, Click on it.
6. Under the ports section look for RELINK HS USB DLoad or Qualcomm HS USB QDLoader or something of that sort.
7. If it shows with an exclamation mark then you have not installed it perfectly. Try restarting your PC or reinstalling the Drivers. Click Here for Detailed Guide on installing the Driver.

How to Repair???

Ans. Flashing the STOCK Rom will help you in overcoming the situation.

Follow this Guide:- Click Here

Comment in the section below if still the problem persists. 

Yunique not detected by PC when flashing STOCK ROM


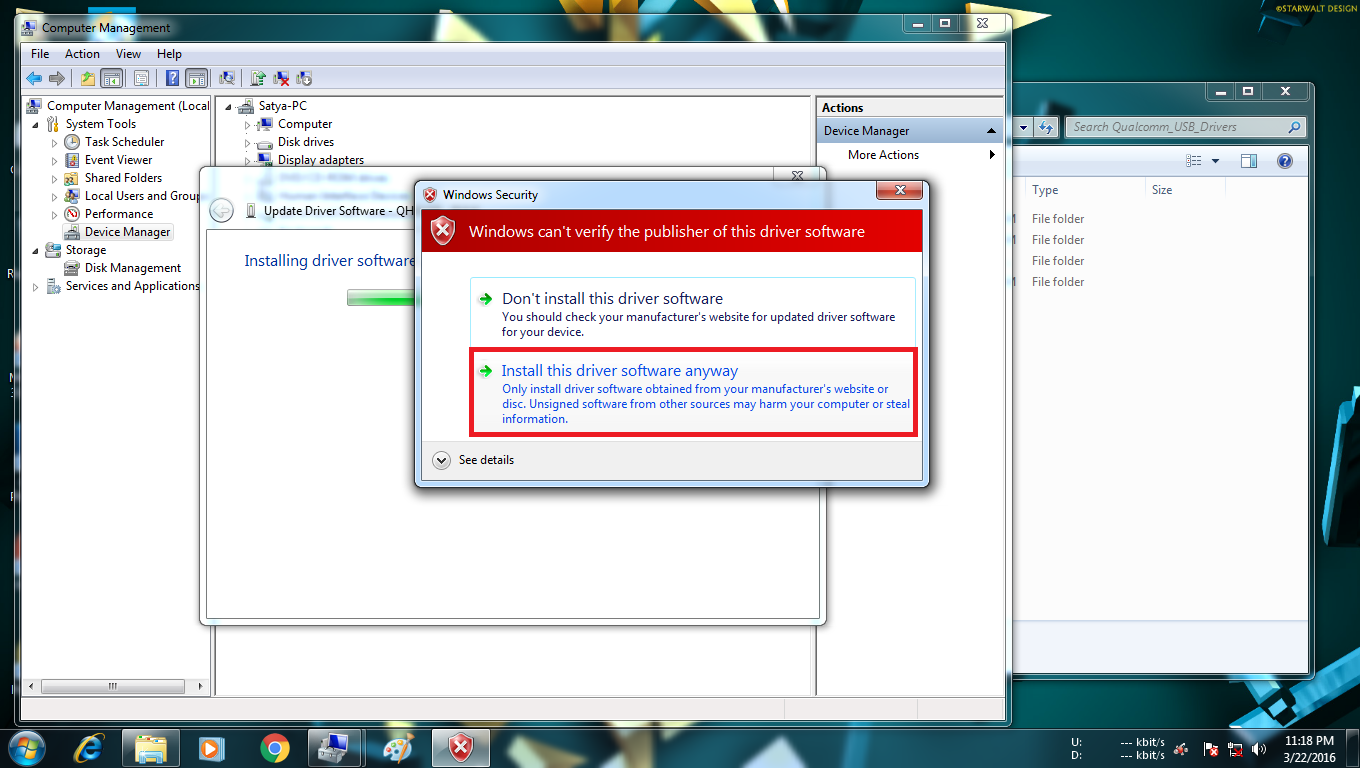
In order to install QHSUSB Drivers.. Your PC must be connected to Internet.

      1. Right Click on "MY COMPUTER"
      2. Click on Manage and Select Device Manager in the Left TAB.
      3. While your phone remains connected to your PC, check for any exclamation mark(yellow coloured) on any of the drivers name QHUSB_DLOAD and click on update.
      4. Select Browse my Computer for Driver Software.
      And browse for the file you downloaded and click on next and Install the drivers.
      5. After this restart your PC and You must see that it is successfully installed.
      6. Now.. Your Problem Must be Solved..
If any PROBLEM is found then never forget to make me know in the comment section below)..


                                       Qualcomm USB Drivers Download - Click Here


Video


Saturday, 9 April 2016

Velocity Kernel v3.0 for Lollipop (5.1.1) ROMs [Yunique]


Prerequisites:

1. Rooted Yu Yunique with custom recovery. Here’s a complete guide of rooting your YU Yunique Safely: How to Root YU Yunique & Install TWRP Recovery.

How to Unlock Bootloader HERE - http://thet3chlover.blogspot.in/2015/12/how-to-unlock-bootloader-on-yu-yunique.html

2. Backup all your data: Contacts, Photos, Apps & other files. (Although you will not lose other files except contacts & Apps, but its better to be on the safer side)


How to Install?

1. Download Velocity Kernel from the Link Below
                       Download

2. Copy it to the root of SD Card.

3. Boot into TWRP Recovery.

4. Goto Install and click on Velocity Kernel.zip file.

5. Finally Swipe to Flash it and reboot without wiping anything. :)

ENJOY!!

Notes:

1. This kernel performs best when used with ROMs based on the latest sources of CyanogenMod.
2. This kernel doesn't requires any other app except for Kernel Adiutor to control the features. Therefore, you people are free to uninstall any other Kernel-Management app. #NoHassles :D

Source Code:
https://github.com/Shoaib0597/Velocity_Kernel_for_Yu-MSM8939/tree/CM-12.1-Jalebi

Credits:
1. Google (for everything related to Android)
2. Cyanogen (for Source Code)
3. Varun Chitre (for ThunderPlug and ThunderCharge)
4. Faux123 (for IntelliDemand Governor, IntelliThermal and IntelliPlug HotPlug)
5. AluCard (for AluCard HotPlug and AluCard Governor)
6. Savoca (for kCAL Colour Control)
7. Shivam Kumar Jha (for help in fixing some errors)
8. Finally the Kernel Developer : Shoaib05

Source:
http://forums.yuplaygod.com/threads/velocity-kernel-v3-0-for-lollipop-5-1-1-roms.32207/

Friday, 8 April 2016

Fixing Updater Script Error [Yunique]

What is a updater script?


To install any ROM through a custom recovery, you need to have an updater-script. It’s basically a few lines of commands that tells your Android recovery what to do. These files are also widely used with Aroma Installer and other scripting engines, but of course everyone knows this already. However, a problem arises when you need to create your own updater-script from scratch, as it’s not always generated during the build process.

Most frequent error that I have seen is the "Updater script error"


To solve this:-

Extract the .zip package of the ROM

Go to META-INF >> com >> google >> android.

Then open "updater-script" binary in Notepad++.

Delete the first line. which says this:- 

assert(getprop("ro.product.device") == "YUNIQUE" || getprop("ro.build.product") == "YUNIQUE" || abort("This package is for device: YUNIQUE; this device is " + getprop("ro.product.device") + "."););


After this repack(add to archive) the contents of the folder extracted.

Note:- Add to zip archive and archive the contents of the folder not the folder directly.